How to Install Laravel Websockets Package - A Drop-in Pusher Replacement

Sometimes we need to be able to send notification within our Laravel application. Most of the times email notification is enough. In addition to support for sending email, Laravel provides support for
sending notifications across a variety of delivery channels, including database, broadcast, nexmo, and slack. In this article, I'll show you how to send notification using broadcast channel.
In many modern web applications, WebSockets are used to implement realtime, live-updating user interfaces. When some data is updated on the server, a message is typically sent over a WebSocket connection to be handled by the client. This provides a more robust, efficient alternative to continually polling your application for changes.
Meet Laravel Websockets Package
The Laravel Websockets is a pure PHP, Pusher compatible websocket package for Laravel. This package allows you to leverage the full power of Laravel broadcasting without an external websocket provider or Node. Other than a drop-in Pusher API replacement, it also has a debug dashboard, realtime statistics and even allows you to create custom WebSocket controllers.
Package Installation
Open terminal on your Laravel's project working directory and require Laravel Websockets package:
$ composer require beyondcode/laravel-websocketsWhen the installation finished, run the built-in migration to enable statistic information while running your WebSocket server. Back to your terminal and run this commands:
$ php artisan vendor:publish --provider="BeyondCode\LaravelWebSockets\WebSocketsServiceProvider" --tag="migrations"
$ php artisan migrate
Next step is to generate Laravel Websockets configuration file:
$ php artisan vendor:publish --provider="BeyondCode\LaravelWebSockets\WebSocketsServiceProvider" --tag="config"To verify our package installed successfully, run this command:
$ php artisan websockets:serveThe response should be like below:
Starting the WebSocket server on port 6001...
If you have similar response, congratulations, you've successfully completed the first step of Laravel Websockets package installation. Next, let's make our websocket server runs in background as a daemon. This way we won't need to run artisan command manually every time the server restarted.
Supervisord Installation
Supervisord / Supervisor daemon / Supervisor is a client/server system that allows its users to monitor and control a number of processes on UNIX-like operating systems. First, let's make sure supervisor is installed.
# On Debian / Ubuntu
apt install supervisor

# On Red Hat / CentOS
yum install supervisor
systemctl enable supervisord
Once installed, we need to add a new process that supervisor needs to keep running. Supervisor's configuration files are located in the /etc/supervisor/conf.d (Debian/Ubuntu) or /etc/supervisord.d (Red Hat/CentOS) directory.
Within that directory, create a new file called websocket.example.com.conf with these contents:
[program:websocket-example-com]
command=/usr/bin/php /usr/share/nginx/html/websocket.example.com/artisan websockets:serve
numprocs=1
autostart=true
autorestart=true
user=www-data
You might have different path and names, adjust as necessary.
Once created, instruct supervisor to reload its configuration files (without impacting the already running supervisor jobs).
$ supervisorctl update
$ supervisorctl start websocket-example-com
Pusher Installation
Laravel Websockets package is meant to be used as a drop-in Pusher replacement. So, we need to install Pusher's official package into our Laravel application. Enter this composer command:
$ composer require pusher/pusher-php-server "~3.0"Next, you should make sure to use Pusher as your broadcasting driver. This can be achieved by setting the BROADCAST_DRIVER environment variable in your .env file:
BROADCAST_DRIVER=pusherWe also need to fill PUSHER_APP_* environment variables in our .env file:
PUSHER_APP_ID=123
PUSHER_APP_KEY=123123123
PUSHER_APP_SECRET=zxcvzxcv
PUSHER_APP_CLUSTER=mt1
You can fill this variables with any value.
When broadcasting events from your Laravel application to your WebSocket server, the default behavior is to send the event information to the official Pusher server. But since the Laravel WebSockets package comes with its own Pusher API implementation, we need to tell Laravel to send the events to our own server.
To do this, you should add the host and port configuration key to your config/broadcasting.php and add it to the pusher section. The default port of the Laravel WebSocket server is 6001.
'pusher' => [
    'driver' => 'pusher',
    'key' => env('PUSHER_APP_KEY'),
    'secret' => env('PUSHER_APP_SECRET'),
    'app_id' => env('PUSHER_APP_ID'),
    'options' => [
        'cluster' => env('PUSHER_APP_CLUSTER'),
        'encrypted' => true,
        'host' => '127.0.0.1',
        'port' => 6001,
    ],
],
Laravel Echo
Laravel Echo is a JavaScript library that makes it painless to subscribe to channels and listen for events broadcast by your server-side broadcasting driver. The Laravel WebSockets package integrates nicely into Laravel Echo.
You may install Echo via the NPM package manager. In this example, we will also install the pusher-js package since we will be using the Pusher Channels broadcaster.
$ npm install --save-dev laravel-echo pusher-jsTo make Laravel Echo work with Laravel WebSockets, you need to make some minor configuration changes when working with Laravel Echo. Add the wsHost parameters and point them to your Laravel WebSocket server host. Optionally, if you used different port for your websocket server, you can use wsPort parameter to specify your websocket server's port.
Open your resources/js/bootstrap.js file.
import Echo from 'laravel-echo';

window.Pusher = require('pusher-js');

window.Echo = new Echo({
    broadcaster: 'pusher',
    key: process.env.MIX_PUSHER_APP_KEY,
    wsHost: 'websocket.example.com',
    cluster: process.env.MIX_PUSHER_APP_CLUSTER,
    forceTLS: true,
    enabledTransports: ['ws', 'wss'],
});
Once you have uncommented and adjusted the Echo configuration according to your needs, you may compile your application's assets:
$npm run dev
Install SSL Certificate
This is 2021. SSL should be used as default. Furthermore, we have Let's Encrypt as our friend. Let's use it.
Make sure you have Certbot installed on your system. I won't discuss it here because it deserves separated article. Maybe I'll write one later.
Once Certbot installed and generated your SSL certificate, it should automatically update your nginx configuration file. It will be similar with below (notice the # managed by Certbot comments):
server {
	server_name websocket.example.com;
	root /usr/share/nginx/html/websocket.example.com/public;
	index index.php index.html;

	location / {
		try_files $uri $uri/ /index.php?$query_string;
	}

	location ~ \.php$ {
		include snippets/fastcgi-php.conf;
		fastcgi_pass unix:/run/php/php7.4-fpm.sock;
	}

	listen 443 ssl; # managed by Certbot
	ssl_certificate /etc/letsencrypt/live/websocket.example.com/fullchain.pem; # managed by Certbot
	ssl_certificate_key /etc/letsencrypt/live/websocket.example.com/privkey.pem; # managed by Certbot
	include /etc/letsencrypt/options-ssl-nginx.conf; # managed by Certbot
	ssl_dhparam /etc/letsencrypt/ssl-dhparams.pem; # managed by Certbot
}


server {
	if ($host = websocket.example.com) {
		return 301 https://$host$request_uri;
	} # managed by Certbot

	listen 80;
	server_name websocket.example.com;
	return 404; # managed by Certbot
}
Update Nginx Configuration
To have the websockets be served at the same location and port as your other web content, Nginx can be taught to map incoming requests based on their type to special sub-locations.
map $http_upgrade $type {map $http_upgrade $type {
	default "web";
	websocket "ws";
}

server {
	server_name websocket.example.com;
	root /usr/share/nginx/html/websocket.example.com/public;
	index index.php index.html;

	location / {
		try_files /nonexistent @$type;
	}

	location @web  {
		try_files $uri $uri/ /index.php?$query_string;
	}

	location @ws  {
		proxy_pass             http://127.0.0.1:6001;
		proxy_set_header Host  $host;
		proxy_read_timeout     60;
		proxy_connect_timeout  60;
		proxy_redirect         off;

		# Allow the use of websockets
		proxy_http_version 1.1;
		proxy_set_header Upgrade $http_upgrade;
		proxy_set_header Connection 'upgrade';
		proxy_set_header Host $host;
		proxy_cache_bypass $http_upgrade;
	}

	listen 443 ssl; # managed by Certbot
	ssl_certificate /etc/letsencrypt/live/websocket.example.com/fullchain.pem; # managed by Certbot
	ssl_certificate_key /etc/letsencrypt/live/websocket.example.com/privkey.pem; # managed by Certbot
	include /etc/letsencrypt/options-ssl-nginx.conf; # managed by Certbot
	ssl_dhparam /etc/letsencrypt/ssl-dhparams.pem; # managed by Certbot
}


server {
	if ($host = websocket.example.com) {
		return 301 https://$host$request_uri;
	} # managed by Certbot

	listen 80;
	server_name websocket.example.com;
	return 404; # managed by Certbot
}
Test And Verification
Finally, the time has come. Now let's test our effort so far. Go to your website's login page. If you're still using Laravel's default layout, you should see the web page calls for this URL (via inspect element):
wss://websocket.example.com/app/123123123?protocol=7&client=js&version=7.0.3&flash=false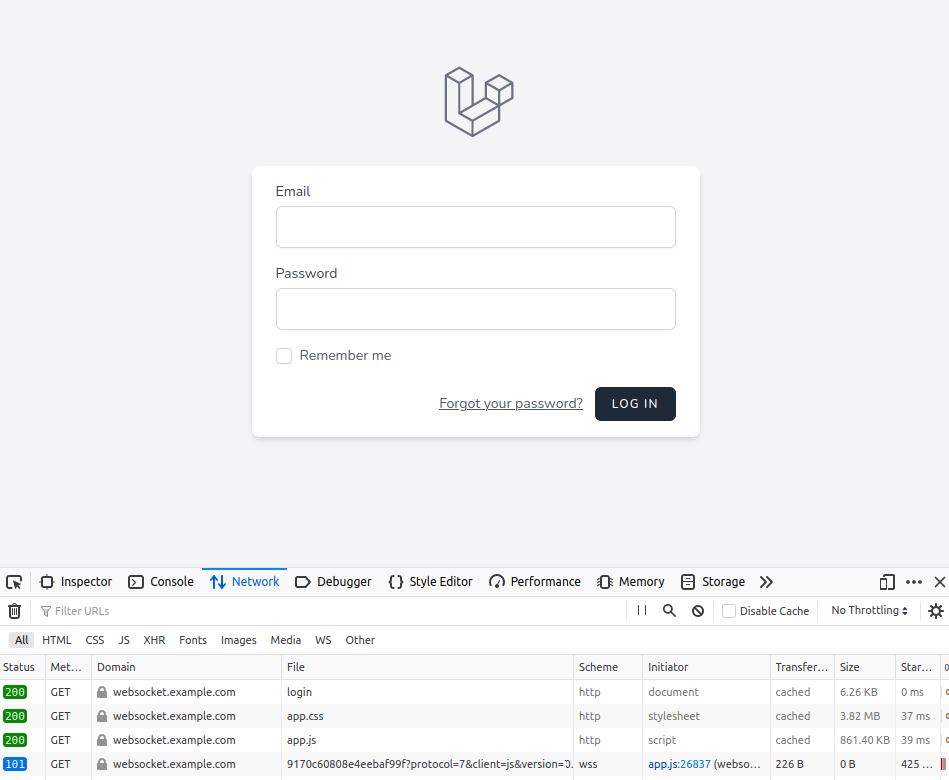 Note the last line above.
Congratulations, you've installed Laravel Websockets package successfully.
Final Words
I hope that you now know how to install Laravel Websockets package. If you run into any issues or have any feedback feel free to drop a comment below.