How to Install PostgreSQL 11 on CentOS 7 Server

PostgreSQL, also known as Postgres, is a free and open-source relational database management system (RDBMS) emphasizing extensibility and technical standards compliance. It is designed to handle a range of workloads, from single machines to data warehouses or Web services with many concurrent users.
As of this writing, the most up-to-date version of PostgreSQL is version 11, released at 2019-06-20. However, the 11 release is not available directly on default CentOS 7 repository. This post will guides you through installing PostgreSQL 11 on a CentOS 7 server.
Prerequisites
Before following this guide, make sure you have:
- A regular, non-root user with sudo privileges.
- A running installation of CentOS 7 with internet access.
Update System Package
To make sure we have latest system package, we must update it. Once this task is done, we'll proceed with upgrade packages to the latest versions. To update your system package, run this command:
$ sudo yum update
If system finds any new version of your installed package, it will shows something like this:
...snipped...
========================================================================================================================
 Package                        Arch                  Version                              Repository              Size
========================================================================================================================
Installing:
 kernel                         x86_64                2.6.32-754.17.1.el6                  updates                 32 M
 kernel-devel                   x86_64                2.6.32-754.17.1.el6                  updates                 11 M
Updating:
 MariaDB-client                 x86_64                10.3.16-1.el6                        mariadb                 54 M
 MariaDB-common                 x86_64                10.3.16-1.el6                        mariadb                162 k
 MariaDB-compat                 x86_64                10.3.16-1.el6                        mariadb                4.0 M
 MariaDB-server                 x86_64                10.3.16-1.el6                        mariadb                123 M
 kernel-firmware                noarch                2.6.32-754.17.1.el6                  updates                 29 M
 kernel-headers                 x86_64                2.6.32-754.17.1.el6                  updates                4.6 M
 libssh2                        x86_64                1.4.2-3.el6_10.1                     updates                123 k
 python                         x86_64                2.6.6-68.el6_10                      updates                 76 k
 python-libs                    x86_64                2.6.6-68.el6_10                      updates                5.3 M

Transaction Summary
========================================================================================================================
Install       2 Package(s)
Upgrade       9 Package(s)

Total download size: 263 M
Is this ok [y/N]:
No worries, just press "y" to update your packages. Wait until the update process finished.
Add PostgreSQL repository
Next step is to add PostgreSQL yum repository to your system. The PostgreSQL yum repository will integrate with your normal systems and patch management, and provide automatic updates for all supported versions of PostgreSQL throughout the support lifetime of PostgreSQL.
- Open PostgreSQL yum repository page (https://www.postgresql.org/download/linux/redhat/) on your web browser.
- Select the version you wish to install and choose platform and architecture of your server.
- Locate the CentOS 7 link for your chosen version and download it to your server. In my case it's
https://download.postgresql.org/pub/repos/yum/reporpms/EL-7-x86_64/pgdg-redhat-repo-latest.noarch.rpm.
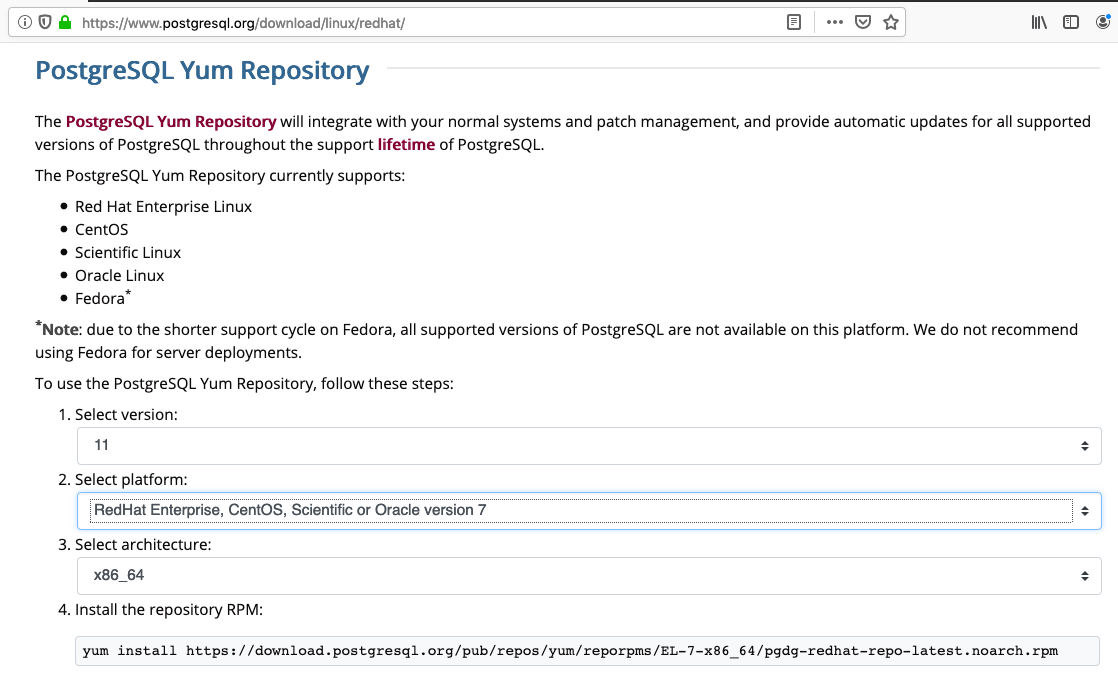
PostgreSQL yum repository page. - Run the command to add PostgreSQL yum repository:
$ sudo yum install https://download.postgresql.org/pub/repos/yum/reporpms/EL-7-x86_64/pgdg-redhat-repo-latest.noarch.rpm
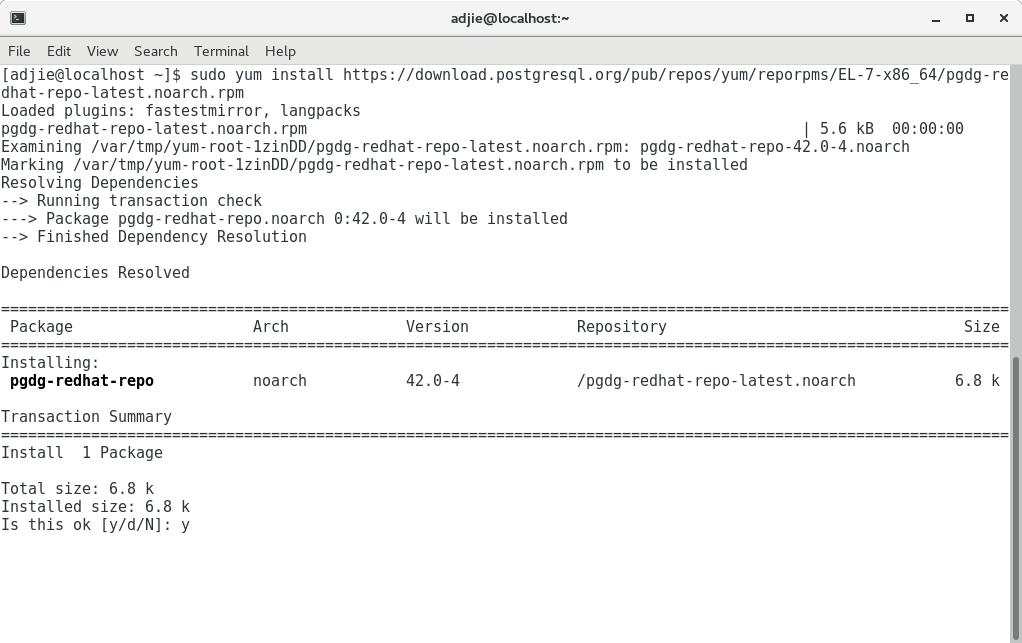
Add PostgreSQL yum repository.
PostgreSQL 11 Installation
We'll install both PostgreSQL server and client on our server. To install the both server and client, run this command:
$ sudo yum install postgresql11-server
System will respond something similar like this:
[adjie@localhost ~]$ sudo yum install postgresql11-server
Loaded plugins: fastestmirror, langpacks
Loading mirror speeds from cached hostfile
 * base: repo.apiknet.co.id
 * epel: ftp.jaist.ac.jp
 * extras: repo.apiknet.co.id
 * updates: repo.apiknet.co.id
pgdg10                                                                                   | 3.6 kB  00:00:00
pgdg11                                                                                   | 3.6 kB  00:00:00
pgdg94                                                                                   | 3.6 kB  00:00:00
pgdg95                                                                                   | 3.6 kB  00:00:00
pgdg96                                                                                   | 3.6 kB  00:00:00
(1/10): pgdg11/7/x86_64/group_gz                                                         |  245 B  00:00:01
(2/10): pgdg10/7/x86_64/group_gz                                                         |  245 B  00:00:01
(3/10): pgdg94/7/x86_64/group_gz                                                         |  247 B  00:00:01
(4/10): pgdg95/7/x86_64/group_gz                                                         |  249 B  00:00:00
(5/10): pgdg96/7/x86_64/group_gz                                                         |  249 B  00:00:00
(6/10): pgdg94/7/x86_64/primary_db                                                       | 304 kB  00:00:01
(7/10): pgdg11/7/x86_64/primary_db                                                       | 229 kB  00:00:02
(8/10): pgdg95/7/x86_64/primary_db                                                       | 298 kB  00:00:01
(9/10): pgdg10/7/x86_64/primary_db                                                       | 282 kB  00:00:03
(10/10): pgdg96/7/x86_64/primary_db                                                      | 301 kB  00:00:02
Resolving Dependencies
--> Running transaction check
---> Package postgresql11-server.x86_64 0:11.4-1PGDG.rhel7 will be installed
--> Processing Dependency: postgresql11-libs(x86-64) = 11.4-1PGDG.rhel7 for package: postgresql11-server-11.4-1PGDG.rhel7.x86_64
--> Processing Dependency: postgresql11(x86-64) = 11.4-1PGDG.rhel7 for package: postgresql11-server-11.4-1PGDG.rhel7.x86_64
--> Processing Dependency: libpq.so.5()(64bit) for package: postgresql11-server-11.4-1PGDG.rhel7.x86_64
--> Running transaction check
---> Package postgresql11.x86_64 0:11.4-1PGDG.rhel7 will be installed
---> Package postgresql11-libs.x86_64 0:11.4-1PGDG.rhel7 will be installed
--> Finished Dependency Resolution

Dependencies Resolved

================================================================================================================
 Package                          Arch                Version                         Repository           Size
================================================================================================================
Installing:
 postgresql11-server              x86_64              11.4-1PGDG.rhel7                pgdg11              4.7 M
Installing for dependencies:
 postgresql11                     x86_64              11.4-1PGDG.rhel7                pgdg11              1.6 M
 postgresql11-libs                x86_64              11.4-1PGDG.rhel7                pgdg11              361 k

Transaction Summary
================================================================================================================
Install  1 Package (+2 Dependent packages)

Total download size: 6.7 M
Installed size: 29 M
Is this ok [y/d/N]: y
Press "y" and then "Enter". System will download all required files and will continue installation afterwards.
Optional
If you're developing some serious application using PostgreSQL, usually you'll need PostgreSQL's Additional Supplied Modules, or if you might've more familiar with postgresql-contrib package. To install it on CentOS 7, run this command:
$ sudo yum install postgresql11-contrib
Initialize Database and Start PostgreSQL Server
We're almost finished with PostgreSQL 11 server installation. Our final step is database initialization and start the server.
$ sudo /usr/pgsql-11/bin/postgresql-11-setup initdb
$ sudo systemctl start postgresql-11
On production server, we usually want to automatically start PostgreSQL server everytime the server boot. To do this, enter this command:
$ sudo systemctl enable postgresql-11
Configuring Postgres for Use
The postgres user
While PostgreSQL become installed, a system user account named postgres was also created with an identical user account in postgres. By default, the postgres user account isn't configured with a password, so it isn't viable to log into the server the use of the postgres user account without first creating a password for it. This postgres account has an all-access pass on your PostgreSQL database server, permission-wise. The postgres user account has similarities to the sa account in SQL server.
The postgres database
PostgreSQL is installed with a default database postgres. For the most part, we use the postgres database for administration functions, and create new databases on the PostgreSQL server to suit our needs.
The psql Command Line Utility
PostgreSQL consists of psql, a command line application for managing your databases and server. While a GUI-based software such as pgadmin3 is often less complicated to use in the daily task, the command line utilty psql is always handy. psql gives total control of your postgres system from the terminal, together with the ability to execute SQL queries.
We will use psql to perform our preliminary configuration and to create an initial database super user.
Create super user account
In this step we will super-user account to deals with our database in the daily task.
To do this, we will get access to the postgres account through your machine root user. Then we'll use that postgres account to create a brand new super-user account for your PostgreSQL installation which can be regulated more efficiently. As an example we will use adjie as our new PostgreSQL super-user account.
$ sudo su -
[sudo] password for adjie:
# su - postgres
$ psql
postgres=# CREATE USER adjie
postgres-# WITH SUPERUSER CREATEDB CREATEROLE
postgres-# PASSWORD 'your-preferred-password';
Notice in the above we can enter multiple lines of command in SQL shell. The SQL is not executed until semi-colon followed enter is found. Which means, the semi-colon will make the shell execute entered commands. After pressing "Enter" it will respond with something like this:
CREATE ROLE
postgres=#
Which means we've successfully created this new superuser account.
Login using our newly created account
Let's verify that everything is working correctly. Try to log in with psql using our new super-user account and create a quick test database:
$ psql postgres
psql (11.4)
Type "help" for help.

postgres=#
Note in the above terminal session, we specified the postgres default database when we logged in, since there aren’ tyet any other databases to connect to.
Create test database
Next test is to create test database test_database using our new super-user account:
postgres=# CREATE DATABASE test_database WITH OWNER adjie;
CREATE DATABASE
postgres=# \connect test_database;
You are now connected to database "test_database" as user "adjie".
test_database=#
If everything works as shown, then congratulations. Now you have a working installation of PostgreSQL 11 on Centos 7.
Optional step
If you would like to manipulate your database in graphical mode, then pgadmin4 is the way to go. Install pgadmin4 by issuing this command:
$ sudo yum install pgadmin4
Final Words
I hope that you now know how to install PostgreSQL 11 on Centos 7 Server. If you run into any issues or have any feedback feel free to drop a comment below.